

You know how on some blogs they have a list of popular posts on the sidebar? In Blogger, there's two ways to do that. The easy way and the hard way. I'm going to talk about both.
But why, why, WHY would you ever want to do it the hard way?! Because it's better. Here's why:
Blogger has a popular posts gadget. It makes it simple. The only problem is, it goes off of page views, not number of comments. Which is great and all, unless you use images in your posts. If so, a post that wasn't really one of your most popular might show up as being so, just because it contained an image that comes up as a search result a ton on Google. It might just be a popular image--- not so much a popular post. With me so far?
So, way #1 is easy, and might do you just fine. Way #2 is harder, but it will actually let YOU choose which ones appear in it. (Other thing to consider: Way #1 will update itself. Way #2 has to be updated by you.)
Way #1: The EASY way.
For the new Blogger layout: (just click on the image to make it larger)

For the old Blogger layout: (Click the image to make it larger)

Way #2 The HARD (albeit more flexible) way.
Step 1: Figure out what posts you want to spotlight.
Step 2: Save an image you want to use from each post somewhere on your hard drive.
Step 3: Create the html code. Now don't freak out if you can't write code from scratch! It's all going to be okay. Blogger is fabulous at writing code for you. We're going to let it. Go into Blogger just like you are creating a new post.
Step 4: Click on the button to insert an image, then select one of those images you just saved onto your hard drive from one of your posts.
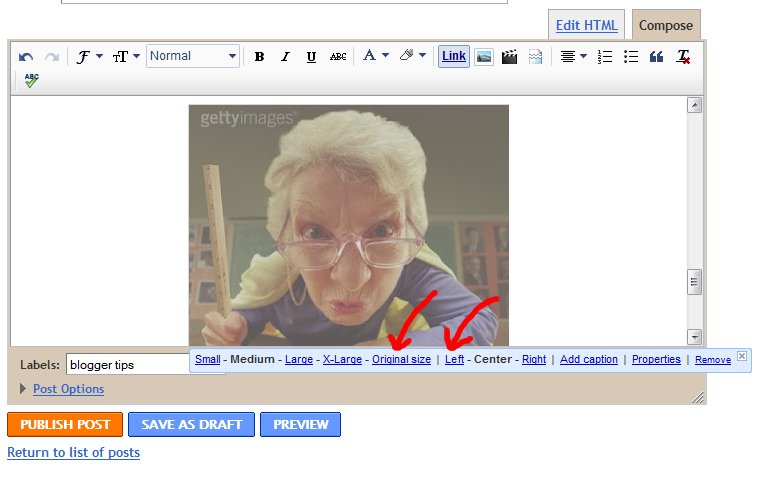
Step 5: Click on the image. Select both Original Size (trust me for a minute) and Left. (I prefer the old Blogger layout, so my images are going to be from that. It's the same either way, I believe.)

See that part I circled that says "s1600"? That's the part that matters (s1600 is in two places-- it's the one toward the end we want). That 1600 is telling the maximum height/width the image can be. We don't want it that big. We want it to be somewhere between 60 and 100. (I changed mine to 60. Take a look at my popular posts in my sidebar to see if that's a size you'd like. If not, change the number.)
Step 7: Click on the compose tab again. Now your image will show smaller. Like this:

Step 8: Type in the text you want to have show on your sidebar. (This will generally be the title of the post that goes with that image.)
Step 9: In a different tab, open that post, highlight the URL, then press Ctrl+C to copy it.
Step 10: Come back to your post, hightlight the text you've typed in, then click on the link link at the top of the post, and paste (Ctrl+P) the URL you just copied. Now it should look something like this:

Step 11: And you're done with the first one! Give your post a title (something like "My list of Popular Posts" or something else that will help you remember), then click SAVE. This will be a post that you will never publish, but that you will want to keep, in case you want to update it later.
Now, go through these same steps for as many posts as you want to have show.
- Once you get them all, click on the Edit HTML tab.
- Press Ctrl + A to highlight all the code in the post.
- Press Ctrl + C to copy it all.
- For old blogger: click on the Design tab at the top. For new blogger, select Layout on the left.
- Click Add a Gadget in your sidebar.
- Scroll down and find the HTML/Java Script option, and click on the blue plus sign.
- For the title, type Popular Posts (or whatever you want it to say).
- Click in the content area, the press Ctrl + V to paste in all that code you created. Then click SAVE.
- At this point, you can move it to wherever in your sidebar you want, then click SAVE.
And you're done! Whew! I know it seems like a lot to do, but once you do it for the first post, it gets a ton easier. Really. I'm not kidding.
Or you can use the easy way and see if it works for you. You can always put in the work to do the harder way later! (Oh, and I should mention that there is a medium way. That's adding a link list gadget. That'll work, too, and let you choose which posts you want, but it won't allow you to have an image with it.)
Questions? Let me know.


29 comments:
Wow, your "How To" instructions are golden. You make it so easy! I try to keep my side bars as clutter free as possible, but I can't resist book marking this anyway.
I've noticed that about Blogger's popular post gadget. So I have the "popular post" gadget set for the past 30 days (so actually popular posts can compete, at least for a little while) AND I have my own select posts I want people to go to.
But determining which posts go in the latter is really difficult, so I don't change it very often ;-)
Very informative post, Peggy! I'm sure I would use the harder one if I only had the time to sort it...
This is a great idea. Maybe, this summer, I will get around to adding this feature to my blog.
Thanks for the great tutorials.
I've been wondering about this. I had no idea you could chose the posts. Thanks for the help!
Wow, sounds like that flexibility takes a lot of time. Ugh.
Versatility rocks again! Thanks for the tips. And any blog post titled "King of the Posts" should probably have a cookie on it.
Very well detailed! Thanks!
Awesome! This is so helpful! Thanks! I'm totally going to try this now!
Really useful post, Peggy - thanks! I went with option 1 a while ago, but when I'm feeling brave I might attempt the second one!
Thanks for laying the process out for me in a way I can understand, Peggy.
Now I just have to decide what posts I want there! That's going to be hard for me, lol.
Very instructive, Peggy. Thanks for the lesson.
Great instructions! I never knew there was a harder way to create a popular posts list. I just knew about the easier one. :)
Wow, this is an amazing post. SO helpful.
Brilliant, Pegasus! Well done. :D
Ah, this is wonderful! Save save save.
http://cookiesandcups.com/homemade-nutter-butters-2/
Thanks for the instructions!
I wasn't sure which posts Blogger would load as "Popular" before, but was intrigued by the gadgets other people had on their sidebars. I had been thinking about putting it up . . . I'll have to remember Way #2. :)
LOL that was supposed to be my signature... umm, not a link to homemade nutter butters.
But... you're welcome.
Thanks for the tip - never would have discovered that one.
This is interesting and so helpful. I am pretty clueless about Blogger. Thanks!
You are super fancy. Love your blog! So glad I followed your Utah comment from Carrie Butler's blog!
Even I can do this with those super easy guidelines you gave us. Thanks!! I appreciate how much you work to make it so easy for us.
From Diary of a Writer in Progress
I'm with Adam above. I have mine labelled "Popular This Month."
Besides, I like to see the posts shifting. :)
Hi Peggy, that was a fantastic read, gripping! After this A-Z challenge is over I may just give that a try!
This is me, Duncan D. Horne, visiting you from the A-Z challenge, wishing you all the best throughout April and beyond.
Duncan In Kuantan
Peggy--thanks for sharing the info. Wow--I need some blogging classes!
Interesting approach. I'll keep it in mind!
Hi Peggy! Thanks for the detailed directions.
Susanne
PUTTING WORDS DOWN ON PAPER
This post truly rocks! I wish I had written it. ;)
Post a Comment